
A campervan water pump does a simple job, but choosing one is easier if you start with the water system rather than the pump. A small conversion with one cold tap and a removable container needs something very different from a fixed tank feeding a sink, shower and water heater.
This guide covers 12V electric campervan water pumps: submersible pumps and external diaphragm pressure pumps. Manual hand and foot pumps are outside the scope of this guide.
For a simple setup, a 12V submersible pump is often the neatest answer. For a larger fixed installation, a self-priming diaphragm pressure pump is usually the more flexible choice. The important part is matching flow and pressure to the taps, pipework and any water heater already in the system.
Some product links in this article are Amazon affiliate links. If you buy through one of them I may earn a small commission, at no extra cost to you.
Submersible or pressure pump?
A submersible pump sits inside the fresh-water container. It is compact, inexpensive and particularly well suited to removable water containers. The trade-off is that the pump itself is in the tank, so it has to be removed with the container or reached through an access point when it needs attention.
A diaphragm pressure pump is mounted outside the tank and draws water through an inlet hose. It normally has an integral pressure switch, so opening a tap drops the pressure and starts the pump automatically. This is the type to look at when the van has several outlets, a shower or a more permanent onboard tank.
Neither type is automatically better. A simple one-tap van does not need a large high-pressure pump, while a shower system can be frustrating if the pump is too small.
A simple removable-tank setup
For one or two outlets, a submersible pump keeps the system uncomplicated. The pump drops into the container, a hose carries the water to the tap and the electrical side can be controlled by a tap microswitch or a suitable pressure-control arrangement.
As a current example, the Whale GP1652 is a 12V high-flow submersible pump intended for leisure-vehicle freshwater systems. It is useful where a basic submersible system needs more flow than the smallest galley pumps, but the manufacturer still says it should not be run dry and limits continuous running time.
Whale GP1652 high-flow 12V submersible pump

If the van only has a single sink tap, even this may be more pump than you need. Smaller submersible pumps can be quieter, cheaper and easier on the battery. Choose for the real job rather than chasing the largest litres-per-minute figure.
When a diaphragm pressure pump makes more sense
A fixed pressure pump is usually the better starting point for an onboard tank feeding several fixtures. It can sit outside the tank, self-prime within the limits given by its manufacturer and start automatically when system pressure falls.
The pressure rating matters. Some caravan and campervan taps, pipe fittings and water heaters are designed around relatively modest pressures, so fitting a much higher-pressure pump simply because it looks more powerful can create problems elsewhere in the system.
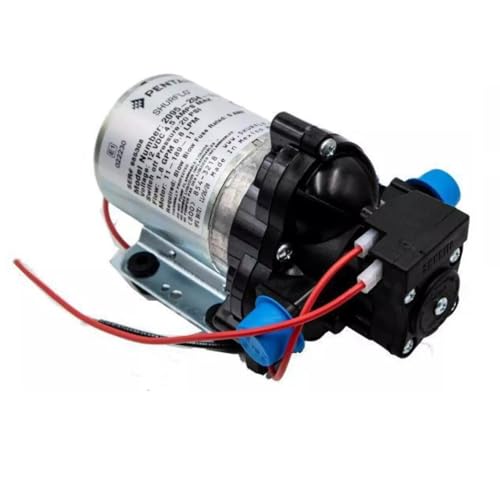
A current lower-pressure example is the Shurflo Trail King 7 rated at 20psi and around 6.8 litres per minute. That sort of specification is much closer to many traditional leisure-vehicle systems than a 45 or 55psi pump.
Shurflo Trail King 7 12V 20psi pressure pump
Flow rate is only half the story
The headline flow figure is normally measured with little or no outlet pressure. Real flow falls as the pump has to work against pipe resistance, fittings, filters, taps and height. A pump advertised at 10 or 11 litres per minute therefore does not mean every tap in the van will receive that figure.
The Shurflo Trail King technical data is a good illustration: its flow reduces as pressure rises. That is why comparing two pumps only by the largest litres-per-minute number can be misleading.
For a sink-only van, modest flow can be perfectly pleasant. A shower generally benefits from more flow, but it also uses fresh water and fills the waste tank faster. There is little value in fitting a pump that can empty a small tank at an alarming rate.
Check the pressure limit of the rest of the system
Before buying a pressure pump, check the maximum working pressure for the water heater, taps, filter housings and fittings. Use the lowest relevant limit as a constraint when choosing the pump.
This is particularly important when replacing an old leisure-vehicle pump. A physically similar replacement can have a very different pressure-switch setting. Matching the original pressure range is usually more sensible than automatically moving to a higher figure.
Do you need an accumulator?
An accumulator is a small pressure vessel fitted on the delivery side of a pressure pump. It stores a little pressurised water and can reduce rapid on-off cycling when only a small amount of water is being drawn.
It can also make the flow feel smoother and reduce the amount of pump noise heard when briefly opening a tap. It is not a cure for a badly sized pump or leaking plumbing, and some modern pump systems already use bypass control to reduce cycling, so check the pump manufacturer’s guidance first.
Pipe size, strainer and tank position
Do not size the pump in isolation. Long runs of narrow hose, restrictive fittings and a clogged strainer can make a perfectly adequate pump feel weak.
Keep the suction side of an external pump short and simple where possible. Fit the strainer specified for the pump and leave it somewhere accessible for cleaning. Use hose and fittings intended for drinking-water systems on the fresh-water side.
If you are still deciding on the tank itself, our campervan water tanks and containers guide covers fixed tanks and removable containers in more detail.
12V wiring and fusing
A water pump may be small, but it is still a motor load. Use the fuse size specified by the pump manufacturer and size the cable for the pump current and the total cable run so voltage drop does not become excessive.
Install a convenient way to isolate the pump. Being able to switch it off quickly is useful when draining the system, dealing with a leak or leaving the van unused.
If you are planning the wider 12V system at the same time, see our campervan electrics DIY guide.
Reducing pump noise
Pressure pumps can transmit vibration into cabinets and the van body. Mount them on the anti-vibration feet or base supplied by the manufacturer, avoid clamping pipework rigidly against panels immediately beside the pump, and leave enough flexible hose to stop the plumbing acting like a sounding board.
Mounting the pump where it can be reached without dismantling furniture is worth the small amount of planning it takes. Filters need cleaning, connections need checking and pumps eventually need servicing or replacement.
Winterising the water pump
Water left inside a pump, filter or fitting can freeze and damage it. Drain the fresh-water system before freezing conditions, open the taps and follow the pump manufacturer’s winterising instructions. External pressure pumps may need their inlet and outlet disconnected so trapped water can escape.
A submersible pump is simple to remove and dry, which is another advantage of a removable-container system.
Which campervan water pump should you choose?
For a straightforward conversion with a removable container and one tap, start with a modest 12V submersible pump. For a fixed tank with several outlets, look at a self-priming diaphragm pressure pump with a pressure setting that suits the rest of the system.
Then check the details: realistic flow, pressure, current draw, fuse size, pipe connections, access for cleaning and whether the pump is allowed to run dry. A well-matched smaller pump is usually a better choice than an oversized one fighting against the rest of the plumbing.