
Step by step guide to fitting a campervan electric hookup inlet
I didn’t want to just rely on the campervan’s leisure battery for power, so I decided to fit a 230V mains hookup to the vehicle. With all the interior removed for painting, I decided that this was a good time to fit the hookup hardware. I bought a campervan electric hookup socket and RCD unit as a pair off eBay for £22.00.
One thing before we get into it: this is an old build-diary entry showing what I did to my own van. The step-by-step bit below is really about cutting the hole and fitting the outside hookup socket. The 230V wiring is a different matter. Rules and best practice move on, so if you’re doing this now, get the mains side designed, fitted and tested by somebody who knows the current caravan and motorhome wiring regulations.
Planning your own hook-up? This page is the original build-diary record of fitting the external inlet. For a current overview of the complete 230V system — including RCD/MCB protection, campsite supply limits and planning — see our Campervan Electric Hook-Up Guide.
Let me show you how I fitted the external inlet…
Step 1:
Firstly, after checking where the outer socket needed to be in relation to the inside and outside of the vehicle, I drilled a small guide hole through the bodywork from the inside.

Step 2:
Next, I stuck some very wide masking tape onto the body of the vehicle, this served two purposes…
1. It gave me a surface to draw on.
2. It helped to protect the paintwork from getting scratched by the jigsaw.
I then drew a horizontal line, central to the two bodywork mouldings.

Step 3:
Using a template of the exact hole size I need to cut out for the hook up housing socket, I lined up the centre of the template with the line on the bodywork…

… and then drew around the template, which gave me the correct size hole in the correct place.
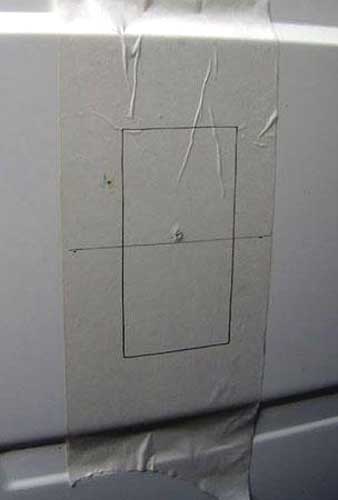
Step 4:
Next, I drilled a hole in each corner. You may notice in this picture that I’ve moved the socket hole up by 5mm. I did this after realising that the hookup socket had a 5mm off-set top to bottom.

Step 5:
Some of the product links in this article are Amazon affiliate links. If you buy through one of them I may earn a small commission, at no extra cost to you.
Next, using a jigsaw (fitted with a metal cutting blade), I roughly cut out the hole…

… then finished it off with a file

… and there we have it, the perfect size hole for the hook up socket.

Step 6:
I then temporarily installed the socket, so I could drill the holes for the self-tapping screws that hold it in place. I drilled the holes slightly smaller than the screws, so they would bite into the body, as well as into the socket backing plate which goes on the inside.

One thing I’d do differently now: after cutting and drilling the bodywork, I’d smooth off the bare metal and protect it against rust before sealing the socket in. It’s a small extra job that could save a nasty rust problem later.
Step 7:
After removing the socket, cleaning around the hole with white spirit and masking off the area around the hole, I applied a generous amount of sealer. If you’re doing this now, make sure the sealer is suitable for caravan or motorhome bodywork; Sikaflex 522 is one current option on Amazon.

Step 8:
The socket was then screwed into place and the excess sealer cleaned off (this is when the masking tape comes in handy) and that’s about it. Looks like it’s always been there!


Looking at the back of the socket from the inside.

When I originally built the van I wired the hookup into the RCD/consumer unit myself, and the next few photos show how I laid it out. I’m keeping them here because they’re part of the original build story, but I’m deliberately not giving the old cable sizes and wiring connections as a how-to. If I were doing this today, I’d get the 230V side properly checked and tested.
This is how the mains side looked in my original build:
The photos below show how I arranged the hookup and RCD/consumer unit at the time.

The following photos show how the components were arranged inside the van at the time.

I had two double sockets fitted to the seating unit, with the distribution equipment arranged so the seating unit could still be removed if needed.

The RCD/consumer unit was mounted to a board fixed to the seating unit.

There you have it, the hookup inlet and internal mains equipment installed as part of the original build.
If you need a hook up socket/inlet box for your conversion, these neat flush fit ones are available on Amazon.
Cost so far £577.00
Next > The refit begins
Removing the interior < Previous